Chapter 4 Creating and Maintaining a Catalog of Data Assets
4.1 Introduction
Keeping track of information assets is a significant challenge in projects that conduct interdisciplinary and highly collaborative research (IHCR). In such projects, data and information may be spread across multiple storage systems and institutions; multiple contributors may be responsible for it at various stages of the project lifecycle. Commercial products such as Starfish provide cataloging and tracking functionality, but such products may be costly and have technical barriers for integration and maintenance.
The workflow below provides a low-cost way for IHCR teams to create and maintain a catalog of their data assets. When used in combination with the overall project plan to guide teamwork and data management (see Section “Implementing a Charter..”), it will improve consistency and efficiency of IHCR data practices. While this workflow focuses on data, it can also be used for managing digital information assets more broadly.
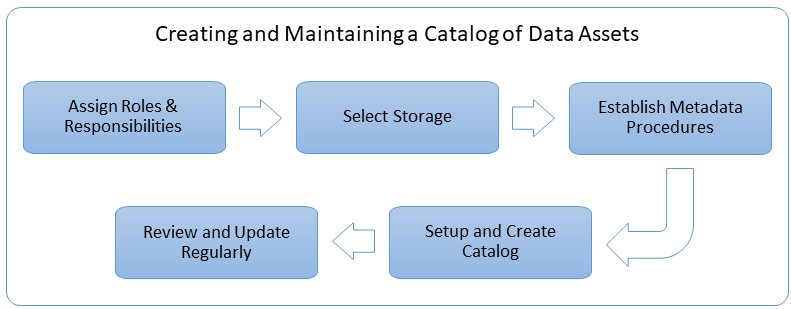
4.3 Implementation Steps
4.3.1 Assign Roles and Responsibilities
The first step in tracking data assets is to designate the roles and responsibilities of project participants to decide who will be involved in data collection and management and how. Identify who will serve as the designated data manager and who will assume their responsibilities in the event the data manager is not available. Depending on the number of project participants, the responsibilities of the data manager can be assigned to one or more individuals.
4.3.2 Select Storage
Once the project team is formed, members can review and decide on the data storage location and the directory structure for all project files and data assets. The choice of storage platform will also impact which of the data catalog options are available; solutions offered below are for local file storage, Google Drive, and the Microsoft 365 cloud suite (OneDrive and Sharepoint).
See also the Section “Organizing Information..”
4.3.3 Establish Metadata Procedures
The data manager (and other members of the team) will need to determine what information about data assets (metadata) is most helpful for data use and reuse. As a general rule, metadata is the who, what, when, where, why, and how of the research data. A basic set of metadata fields is described below in the section “Manual Creation of Data Catalog”, but there will likely be additional fields specific to the project that should be included for the most complete description of each data asset.
4.3.4 Setup and Create Data Catalog
The data catalog can be set up and created via manual collection that uses a data cataloging form, automated inventory procedures (see “Appendices” for detailed instructions), or a combination of both methods. If using both the manual and automated collection methods, the data manager will need to reconcile the data catalog with the periodic inventories to maintain a full record of the project’s data assets. As part of the catalog setup, all project members need to be assigned access permissions. For example, the catalog should be viewable to any project member, but it should only be edited by the data manager(s) and data cataloger(s).
As part of the catalog setup, all project members need to be assigned access permissions. For example, the catalog should be viewable to any project member, but it should only be edited by the data manager(s) and data cataloger(s).
4.3.5 Review and Update Regularly
The data manager should periodically review the data catalog to ensure consistency and check that no information is missing. This includes confirming that file naming conventions are followed, that files are stored in the correct locations, and that there is no unnecessary duplication of files. If additional metadata fields were not added to the catalog by the workflows described in this document, they need to be added to the catalog manually.
Periodic evaluation and update can be done in two ways: via a manual review of the data catalog or by running the automated inventory described in Appendix B. Reviews should be done at regular intervals to avoid a backlog of work and to catch and rectify potential errors in cataloging as early as possible instead of at the end of a project’s data collection. The reviews should be scheduled in weekly or monthly intervals depending on the pace of the project and its data collection processes.
4.4 Appendices: Detailed Instructions
Appendix A. Manual Creation of Data
The data catalog is a list of all data assets that are described consistently and uniformly using a set of attributes. Some attributes may be set to “optional” if they are not essential to each data asset.
The catalog can be created and tracked manually via a data cataloging form using Google forms, Microsoft forms, Qualtrics, or any other surveying or spreadsheet software. It can also be created as a template spreadsheet where each attribute is a column and each data asset forms a row.
The template below lists the suggested minimum information needed to describe each asset; it can be customized to add more metadata fields according to the needs of a project.
- Asset ID (required): Unique asset ID assigned automatically or by the data manager. This field needs to be entered directly into the catalog instead of through the cataloging form.
- Data Collector (required): Name(s) of individual(s) who collected the data.
- Contributor (if different from data collector, optional): Name of the individual who created the record.
- Date of Collection (required): Date(s) data was collected.
- Keyword(s): A list of project-specific descriptors that can help in search and organization. These tags can include experiment names, institutions, geographic locations, and so on. At the beginning the tags can be free-form, but later on it is recommended to standardize the tags and create a controlled vocabulary.
- Description (required): Short description of contents (what is the nature of this data, methods used in collection, any details of importance to the project).
- State (optional): Current state of the asset (e.g., to be created, created, cleaned, transformed, verified). The states are project-specific and can be determined by the team in advance.
- Storage Location (optional): Location of the asset being cataloged (e.g., central project location, individual member’s storage, etc.).
- Path (optional): Where or how to find this asset. Can be a full path (e.g., “C”:My DriveFilename.csv”) or a relative path (e.g., folder “Data files”).
- Notes (optional): Any notes about the item being cataloged that are useful to include in the catalog.
Appendix B. Data Catalog via Automatic Inventory
B1. Use Microsoft Excel to Create a Data Catalog of a Local Directory (Windows Machine Only)
The following steps will create a file list of a specified directory (and any subdirectories) stored on a local machine. The file list will include file information metadata and the link to both the individual file and to the folder a file appears in.
- Open a new workbook in Excel, then navigate to “Data”-> “Get Data”-> “From File” ->“From Folder”

- Choose the directory you want to index and click “OK” (older versions of Excel) or “Open” (newer versions). In the new dialogue box that opens, choose “Transform Data”.
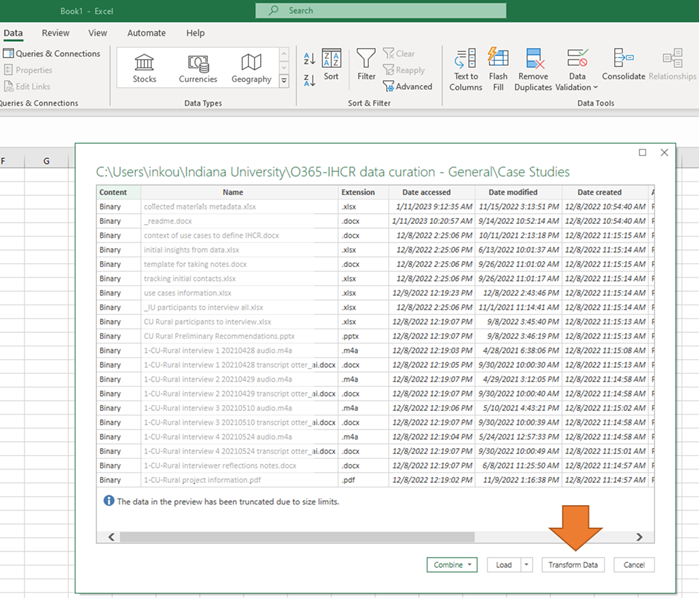
- In the Power Query window that opens, the fields that will be created for each file are listed as columns. To remove a field before running the query, right click the heading title and choose “Remove”.

- Click the “Close and Load” button at the top left corner on the menu; the data will then populate in the sheet.

Save the file according to the file naming convention determined by the data manager to save a static copy of the directory’s contents.
To have snapshots of the catalog over time, create an inventory periodically and add a date to the file name.
B2. Create a Data Catalog of Microsoft Online Document Storage (SharePoint) and Save It on a Local Machine (Windows Machine Only)
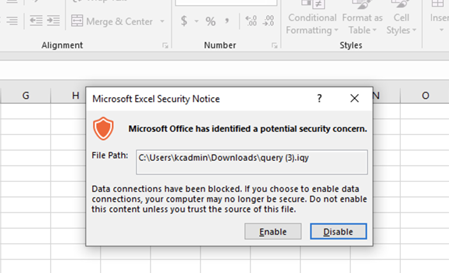
Note: This workflow generates a web query file “query.iqy” that cannot be run or opened on a Mac as the internet query connection is not supported by Excel for Mac. As a workaround, you can run this on Excel for Windows, save the file as XLSX and then open it in Excel for Mac. You’ll be able to see the data but you won’t be able to refresh the data connection.
- Open SharePoint in a browser and log in as necessary.
- Navigate to the directory that needs to be indexed.
Note: Organizations may have their SharePoint platforms configured differently. Navigate to “Documents” within the project’s Sharepoint page and then open the directory to be indexed.
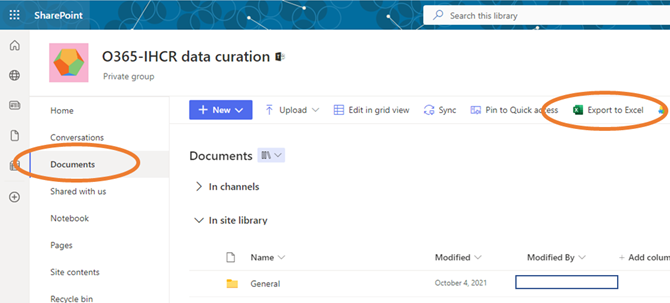
Click “Export to Excel”. This will generate and download an Internet Query File called “query.iqy” (the file should download into the default download folder for your browser).
Navigate to your download folder and double-click on the ‘query.iqy’ file. Enable a connection to your online SharePoint platform when prompted (see image below).
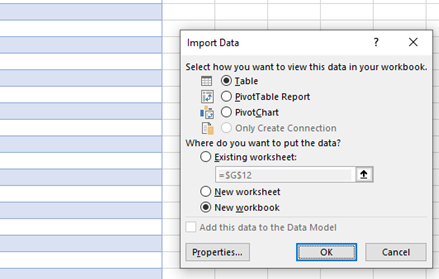
- The file will be opened as an empty workbook initially. You will be asked to select how the data should be imported. Select “Table” to have the full folder contents listed (selecting “PivotTable Report” or “PivotChart” will aggregate and summarize the data rather than generate full folder contents). Next, under “Where do you want to put the data?”, select the location for the index (in a designated area of the existing worksheet, a new worksheet in the current file, or in a new workbook).
- The new file will be populated with the following information:
- Name: name of the file or folder with a link to its online version
- Modified: the date when the item was modified
- Modified by: name of the user who modified the item last
- Item type: “item” refers to files, “folder” refers to folders
- Path: the path within folder hierarchy (no link to the online content).
Save the file according to the file naming convention determined by the data manager to save a static copy of the directory’s contents. To run the index again on the same directory, either run the downloaded iquery file again or follow the steps above to download a new iquery file. If you plan to use the same iquery file to index a directory each time, it is recommended that you rename the file with the name of the Sharepoint Site and Directory it indexes.
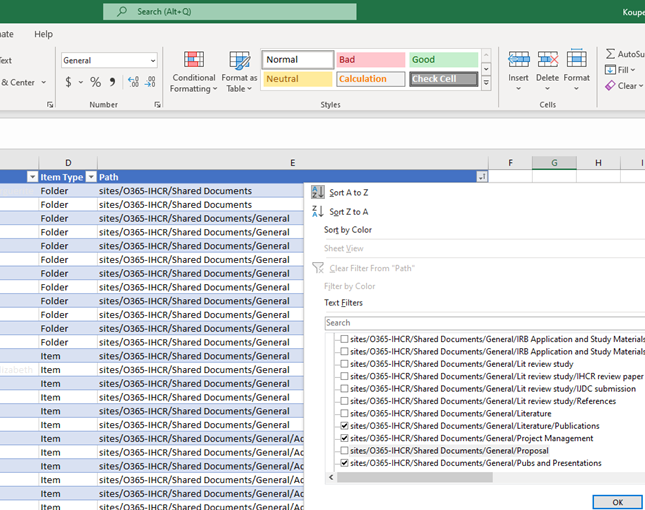
By default, the data catalog generated by this query is arranged alphabetically by name with all folders going first and all items (files) going after all the folders. To view the index by directory, sort the rows alphabetically by the column “Path” (Home -> Sort & Filter - Custom Sort).
- To sort further within each folder, use “Custom Sort” and add columns to the sort parameters (e.g., name or modified).
- To view files only (without the folder names in the column “Name”), click on the down arrow to the right of the column “Item Type” to view options for that field, and then deselect “Folder”.

- To only display items from specific folder(s) for review, click on the down arrow to the right of the Path column, uncheck “Select All”, and then select only the desired folder(s):
4.4.1 B3. Create a Data Catalog in Google Drive using a Google App Script
The following steps will create a recursive file listing of a specified directory (and any subdirectories) stored in Google Drive with metadata, the file path, and links to both the individual file and to the folder a file appears in.
- Create a new google sheet to store the file inventory in your project directory.

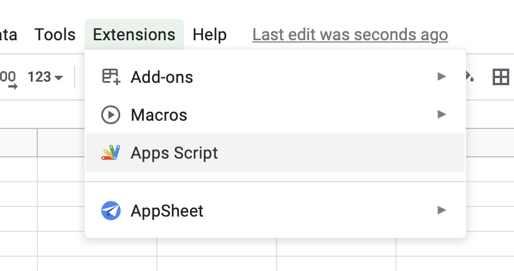
- To add the App Script to the document, go to “Extensions”-> “Apps Script”.
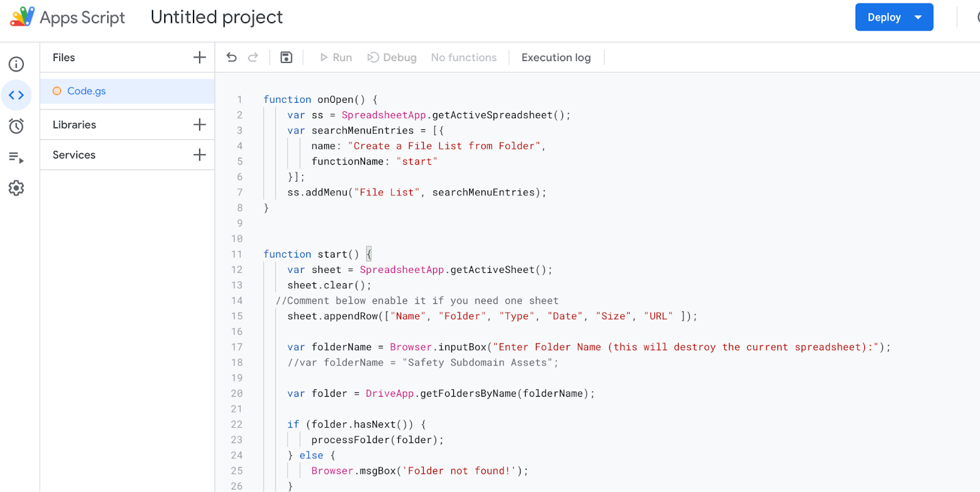
In the App Script that opens, remove any content that is there and paste the code block from the end of this section (if needed, the metadata fields to be collected can be changed and/or reordered in the last section of code).
Give the script a meaningful name (e.g., “FileList”), then save the project by clicking on the diskette icon at the top. Click “Run”.
Close the tab with the Apps Script and the tab with the google sheet, then reopen the sheet. You will now see a new menu option named “File List”.
- To run the inventory, click “File List” then choose “Create a file list from folder”. Enter the name of the directory whose contents you want to inventory in the dialogue box that opens.

If asked to allow access, choose “Continue” then provide your credentials. (You may need to repeat the previous step after providing authorization).

The script will then populate the sheet with a list of files from the specified directory with the metadata specified. You can run the script in multiple worksheets within the same GoogleSheet for different directories if needed, or run it for the full directory.
Code for Apps Script
         //Function that creates the menu link in the sheet to run the inventory
         function onOpen() {
            var ss = SpreadsheetApp.getActiveSpreadsheet();
            var searchMenuEntries = [{
                name: "Create a File List from Folder",
                functionName: "start"
            }];
            ss.addMenu("File List", searchMenuEntries);
         }

        //Function that builds the inventory
         function start() {
            var sheet = SpreadsheetApp.getActiveSheet();
            sheet.clear();
          //Comment below enable it if you need one sheet
          //Builds the column headings
            sheet.appendRow(["Name", "Folder", "Type", "Creation Date", "Size", "URL","Folder URL", "Path" ]);

            //Makes the Input Box to specify which folder the inventory will run on
            var folderName = Browser.inputBox("Enter the Name of the Directory to be Inventoried (this will overwrite the current spreadsheet):");

            //Fetches the folders
            var folder = DriveApp.getFoldersByName(folderName);


            if (folder.hasNext()) {
                processFolder(folder, '');
            } else {
                Browser.msgBox('Folder not found!');
            }

          //Returns the information for each file in the specified folder
            function processFolder(folder, path) {
                while (folder.hasNext()) {
                    var f = folder.next();
                    var contents = f.getFiles();
                    var fName = f.getName();
                    addFilesToSheet(contents, f, path);
                    var subFolder = f.getFolders();
                    processFolder(subFolder, path + '/' + fName);
                }
            }
            //Outputs the file inventory
            function addFilesToSheet(files, folder, path) {
                var data;
                var folderName = folder.getName();

                while (files.hasNext()) {
                    var file = files.next();
                    Logger.log(file.getName());
                    Logger.log(file.getParents());

            //Specifies the fields returned in the inventory
                    var fileName = file.getName();
                    sheet.appendRow([
                      fileName,
                      folderName,
                      file.getMimeType(),
                      file.getDateCreated(),
                      file.getSize()/1024,
                      file.getUrl(),
                      folder.getUrl(),
                      path + "/" + folderName + "/" + fileName,
                    ]);
                }
            }
         }